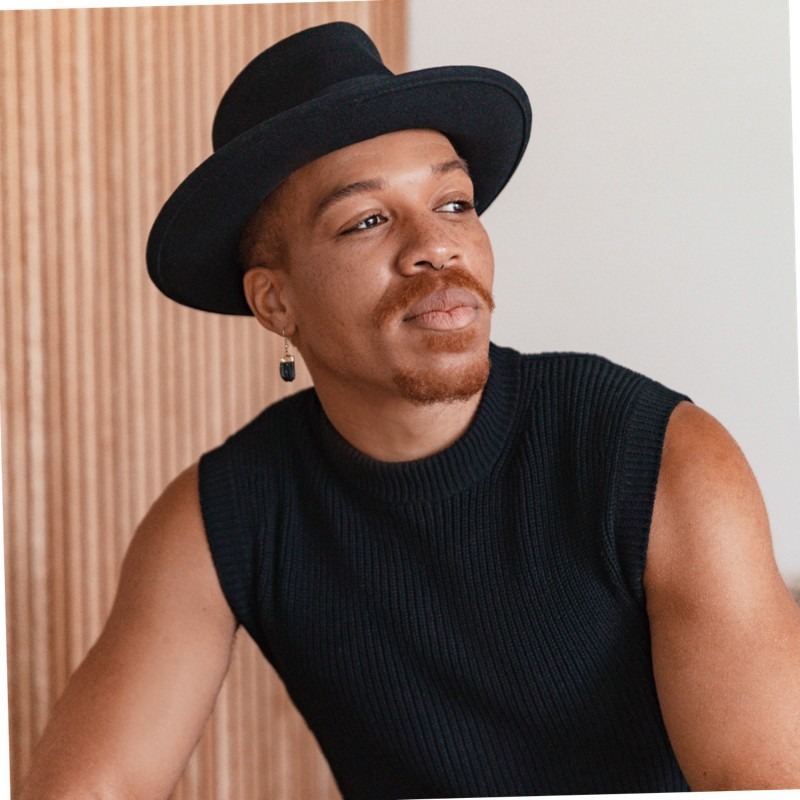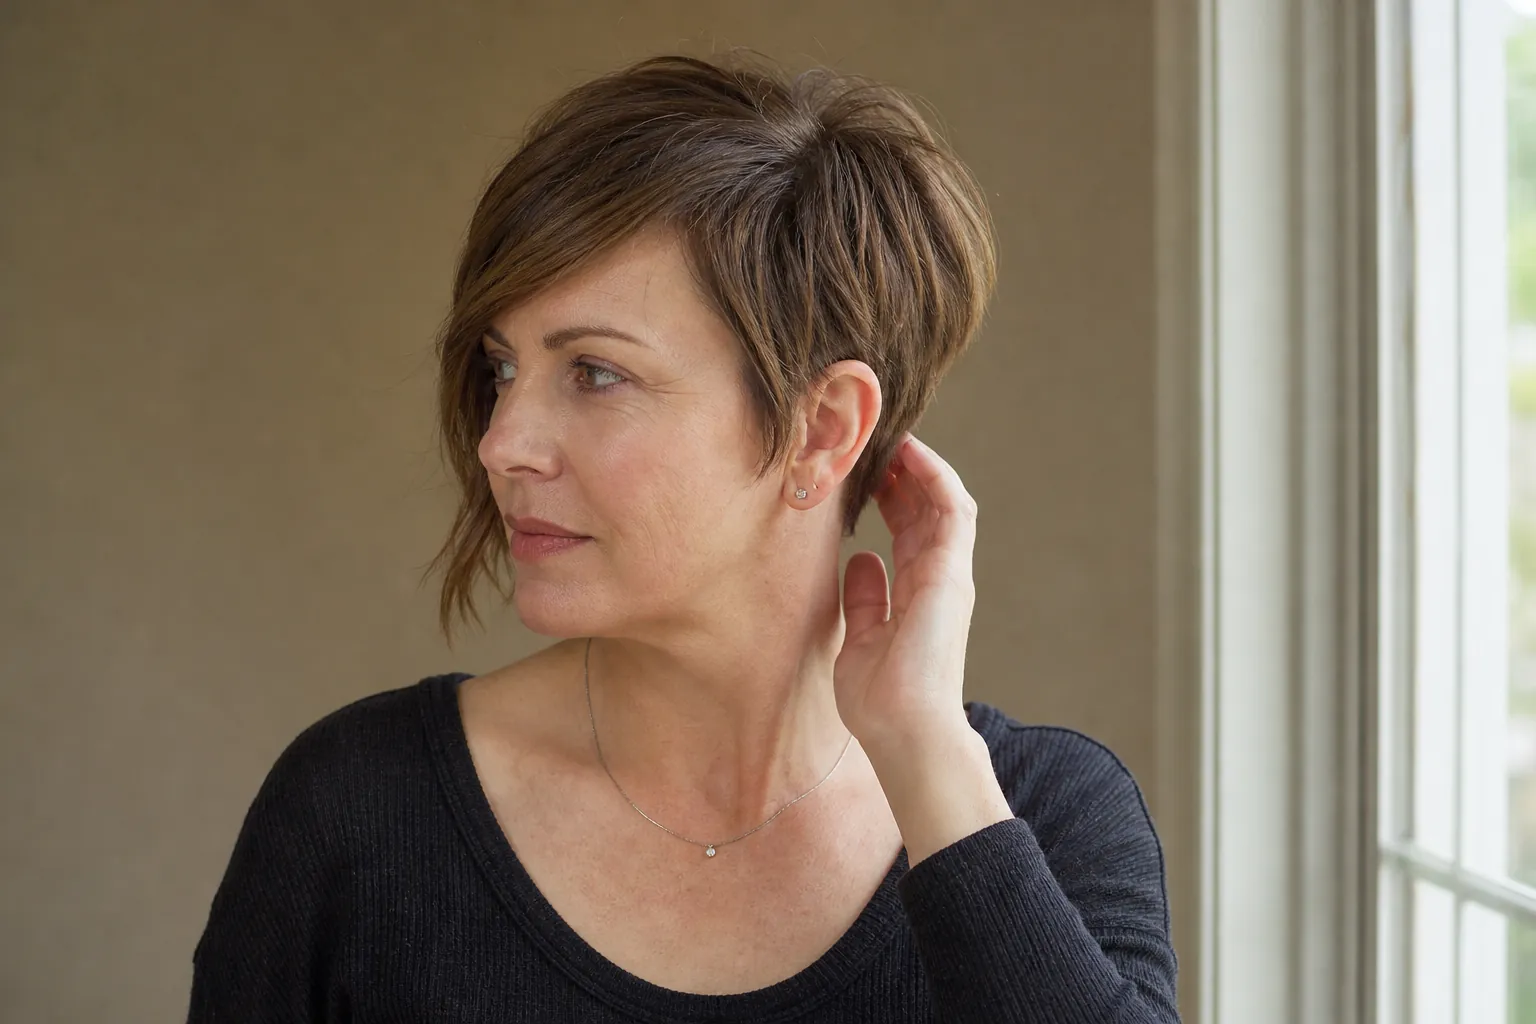
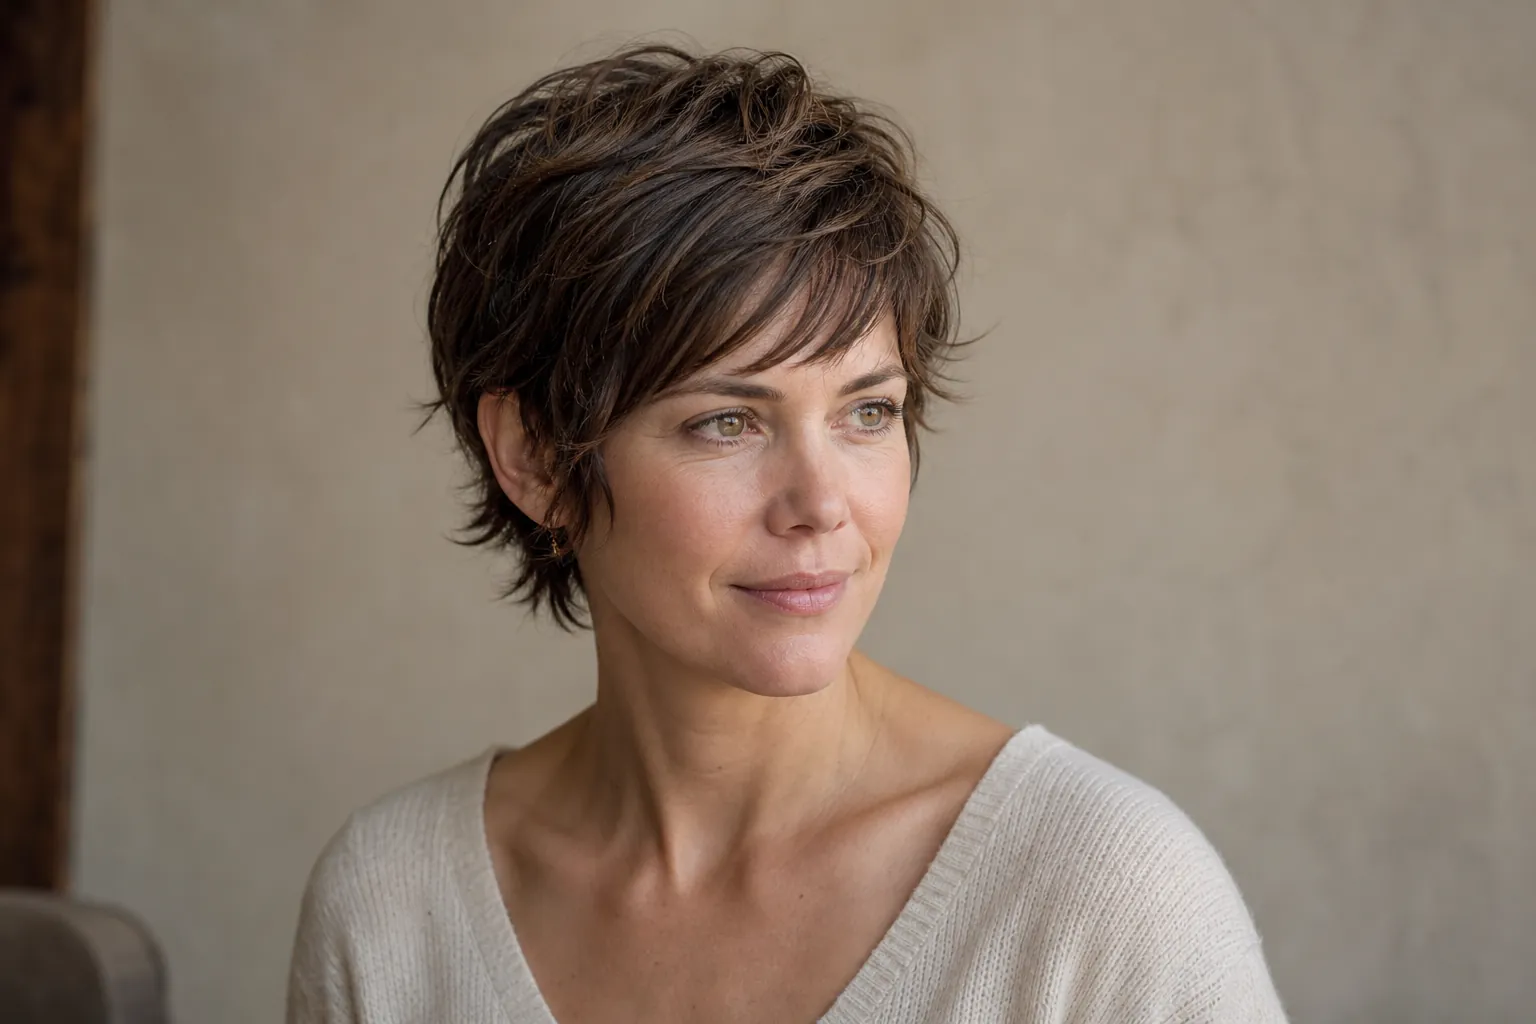
Short version: A shaggy pixie cut is a pixie with its layers cut short and uneven across the crown and fringe, so the top stands in separate pieces instead of lying in one smooth shape. It works best on straight or wavy hair of fine to medium density, and on curls and coils when the layers follow the curl pattern. Expect a trim every 4-6 weeks and 3-7 minutes of rough-drying and dry product most mornings.
How a Shaggy Pixie Cut Is Built
A shaggy pixie is a pixie whose top is cut in visible steps: short layers at the crown, longer pieces toward the fringe, and ends broken up so they overlap instead of stacking into a clean line. Where a classic pixie relies on a tidy shape, this one relies on the difference in length between neighboring pieces. The basics of top length, fringe and nape are covered in our main pixie cut guide; this page goes deeper on the layering.
Three variables define the look. The first is step size: layers 1/2 inch apart read as soft texture, while steps of an inch or more read as choppy. The second is where the shortest layer sits, at the crown for lift or nearer the fringe for a messier front. The third is how the ends are finished, which is the razor-versus-scissors question below. A fuller shag with cheekbone and chin layers is a different cut, covered in our short shag guide, and a version with ear-covering sides and a longer front is a bixie.
Edgy is a styling and finishing choice layered on top of this: an undercut, an asymmetric fringe, a longer nape or a disconnected top. The gallery below runs from soft shaggy to properly edgy, then moves to fringe variations and to curly and coily hair, where the same ideas are executed differently.
Razor, Point Cutting and Texturizing Shears Compared
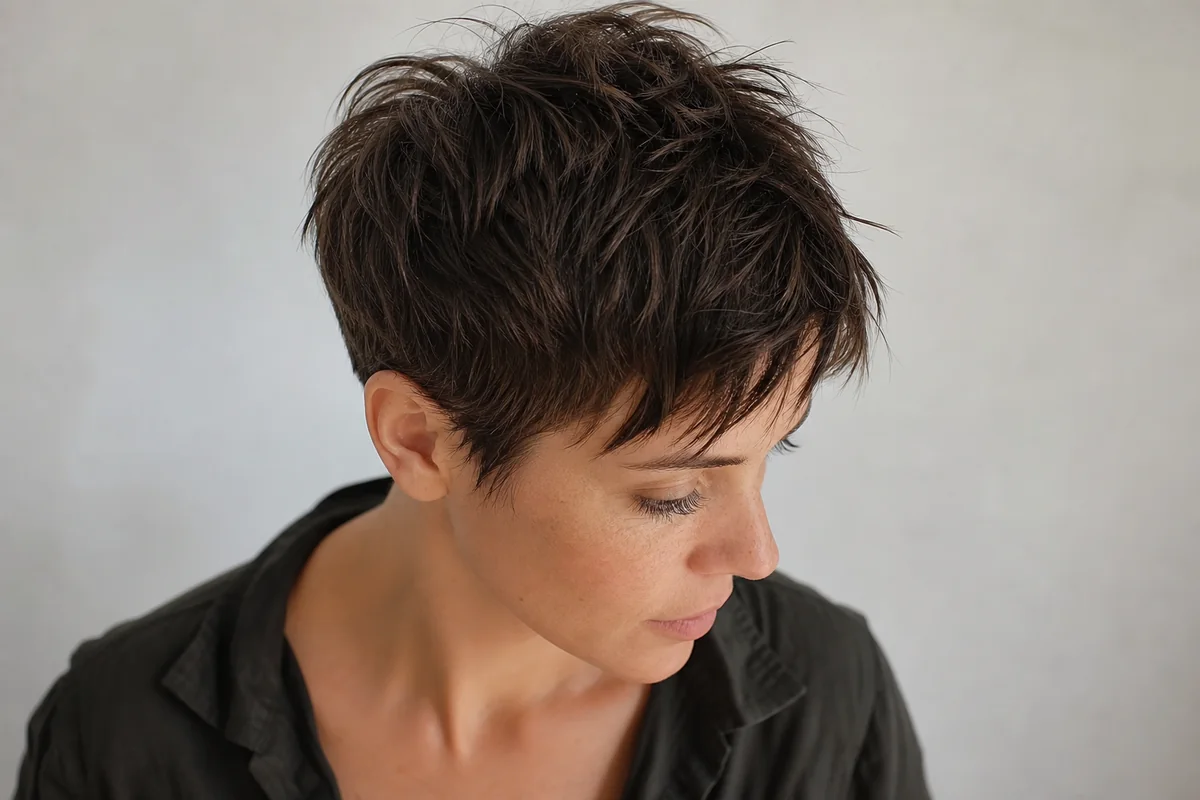
Point cutting and razoring both break up the ends, but they behave differently on short hair: point cutting snips into the ends with the scissor tips, so the result is blunt-ish and sturdy, while a razor slides across the hair and leaves tapered, feathered ends that look softer and wear out sooner. The choice depends on how much body the hair has to spare.
| Method | Finish | Best on | Risk |
|---|---|---|---|
| Point cutting (scissor tips) | Sturdy, separated ends | Fine to medium straight or wavy; thick hair for interior weight | Low; the safest choice for a first shaggy pixie |
| Slide cutting (scissors glided down the strand) | Soft, graduated pieces | Medium to thick straight hair | Can leave wispy ends if overdone on fine hair |
| Razor | Feathered, tapered ends | Medium to thick straight hair; some wavy hair | Frizz on dry or curly hair; stringy ends on fine hair |
| Texturizing or thinning shears | Removes bulk within a section | Thick straight hair, used in the interior | Short hairs that poke out on wavy and curly hair; thin ends on fine hair |
Salon note: Razor work is best done on damp hair and with a fresh blade, because a dull blade tugs and roughens the cuticle. On fine hair, most stylists keep the razor to the last half inch of the ends, if they use it at all, so the layers stay thick enough to stand. On curls, a razor is often avoided because it leaves a frayed edge that frizzes.
Soft Shaggy Pixies with Crown Layers
Crown layers give a pixie lift without any product at all, and they are the gentlest introduction to the shaggy look. They suit straight and wavy hair that falls flat and need little more than a rough-dry.
1. Shaggy Pixie with Short Crown Layers on Fine Straight Hair
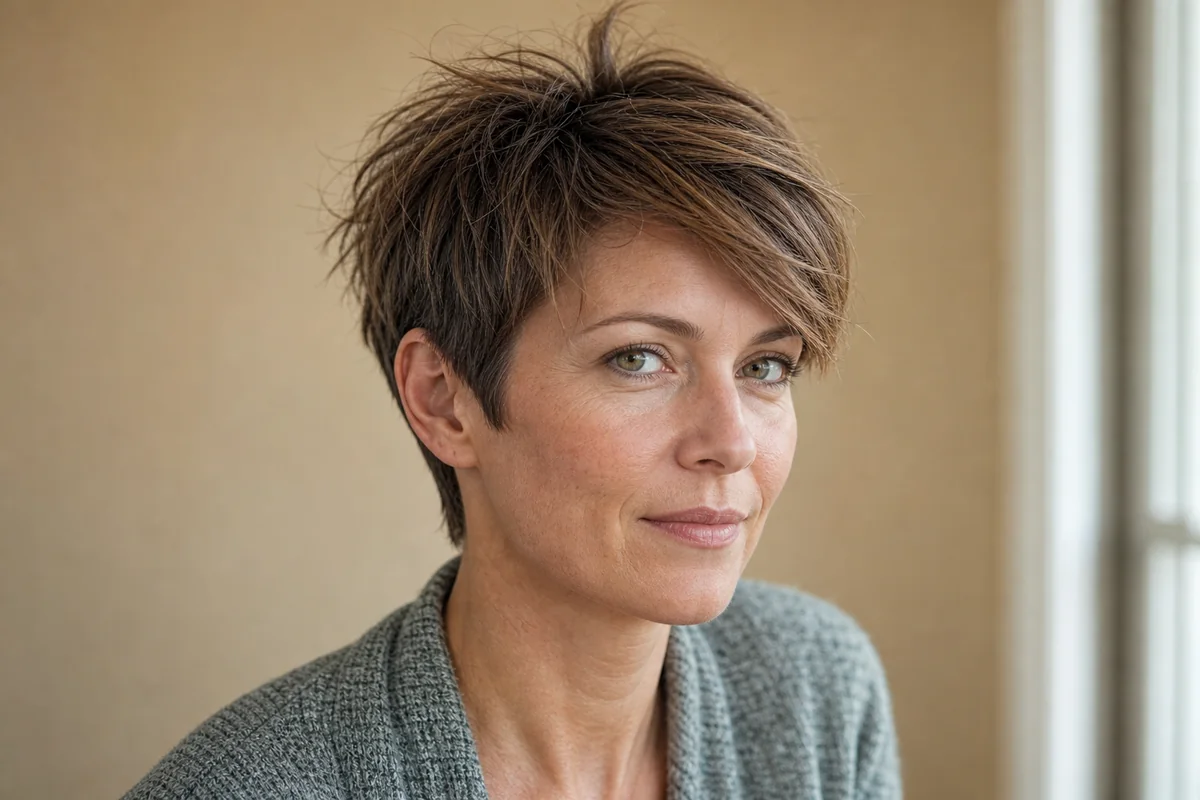
- Length
- 1.5 in at the crown, 2.5-3 in at the fringe
- Texture
- Straight
- Density
- Fine
- Face shapes
- Oval, heart, long
- Daily effort
- 3-5 minutes
- Trim every
- 4-5 weeks
Hair this fine loses its shape fastest at the crown, so the layers there are kept shorter than the front and cut with the tips of the scissors rather than a razor. The result keeps the thickness at the hem while the top stands.
Ask for: "A pixie with crown layers about an inch and a half, a 3-inch fringe, point cut, and no razor on the ends."
2. Wavy Shaggy Pixie with Silver Ends

- Length
- 2-3 in on top, short layered sides
- Texture
- Wavy (2B-2C)
- Density
- Medium
- Face shapes
- Oval, round, square
- Daily effort
- 3-5 minutes
- Trim every
- 5-6 weeks
Waves do the layering's work here: even steps of half an inch break into soft pieces once the hair dries. Gray that has turned wiry can look rough in a choppy cut, so a light cream or a drop of oil at the ends keeps the texture polished.
Ask for: "A shaggy pixie that follows my waves, with the layers checked dry and no thinning shears."
3. Shaggy Pixie with Interior Weight Removed for Thick Hair
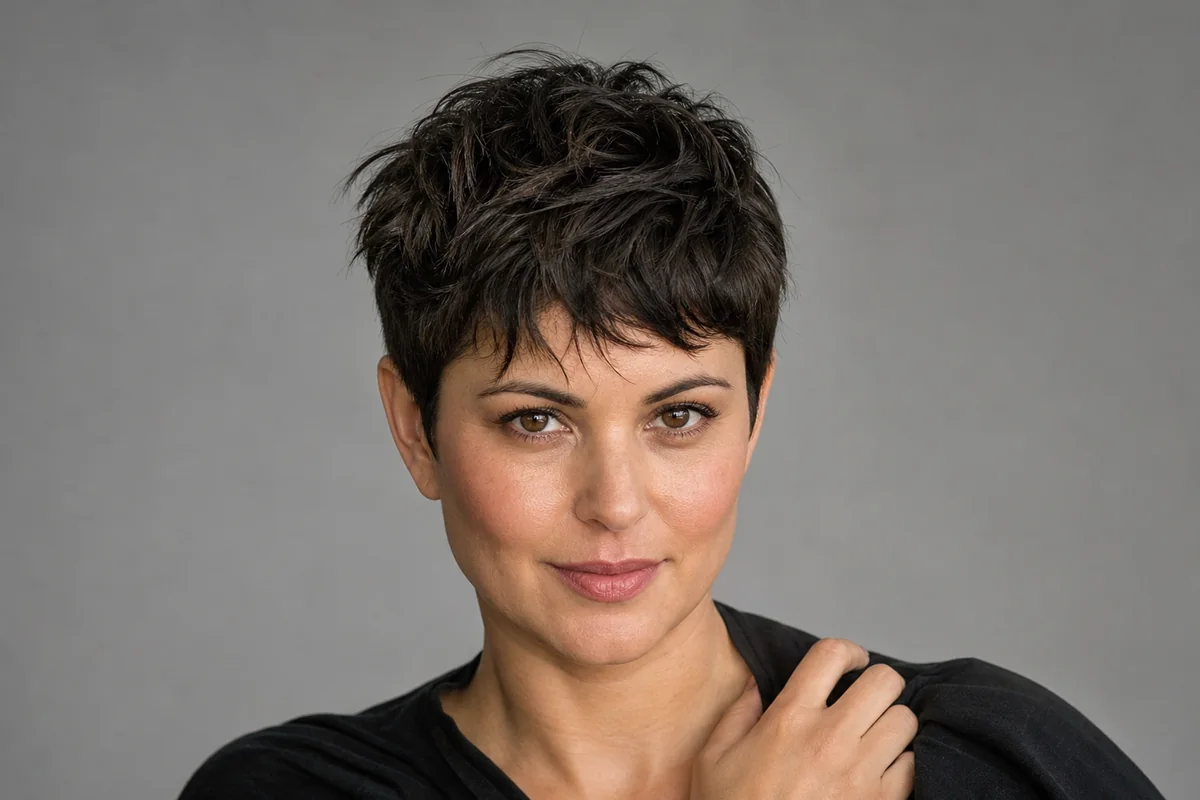
- Length
- 3 in on top, sides tapered close
- Texture
- Straight
- Density
- Thick
- Face shapes
- Oval, long, square
- Daily effort
- 5 minutes
- Trim every
- 4-5 weeks
The shaggy look on thick hair comes from what is removed underneath, not from cutting the surface shorter. Slide-cut channels through the interior let the top pieces lie apart instead of stacking, which is the usual cure for a pixie that sits like a helmet.
Ask for: "Remove weight from the inside with slide cutting, keep 3 inches on top, and taper the sides so they stay flat to the head."
4. Shaggy Pixie with a Feathered, Slightly Longer Nape
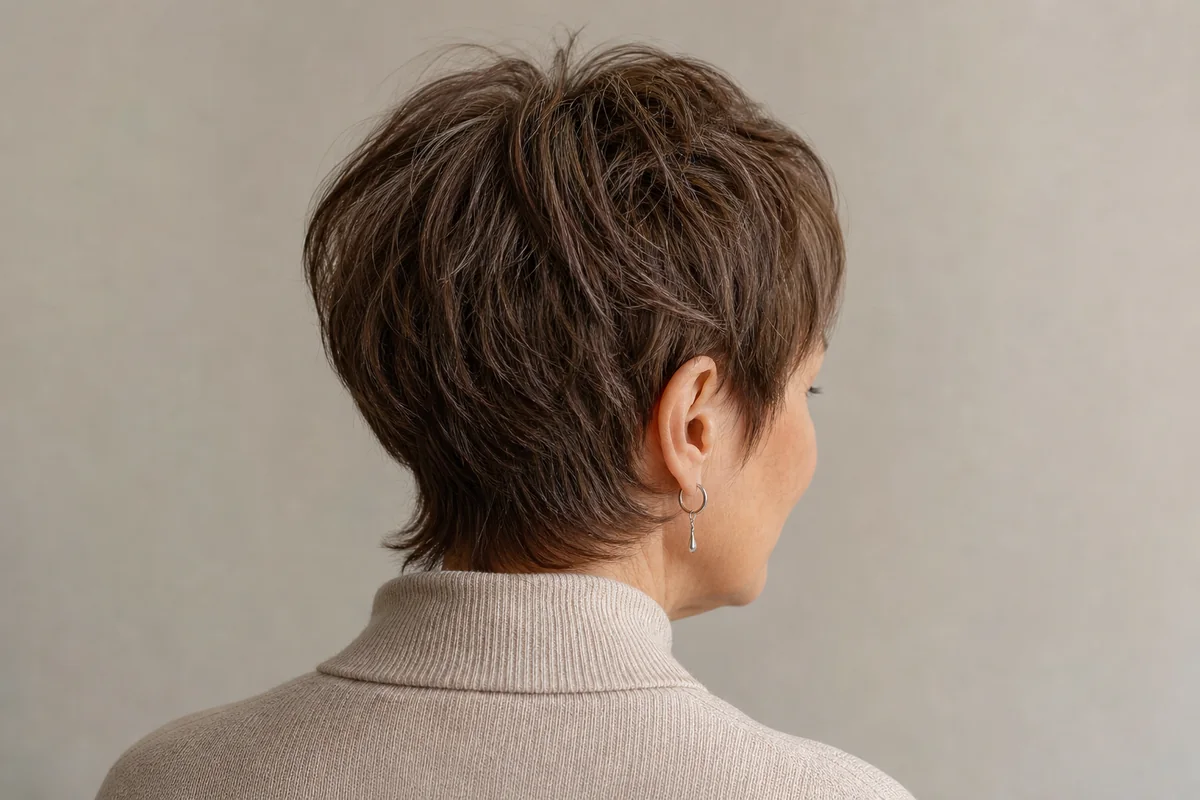
- Length
- 3 in on top, about 2 in at the nape
- Texture
- Straight to wavy
- Density
- Medium
- Face shapes
- Oval, round, heart
- Daily effort
- 5 minutes
- Trim every
- 6-7 weeks
Leaving the back at about two inches, with ends broken up rather than clippered, is the most forgiving arrangement for anyone who stretches appointments. The longer nape grows into a softer shape instead of a fuzzy edge, so weeks five and six look intentional, not overdue.
Ask for: "Leave the nape around 2 inches, point cut and feathered, not clippered. I want it to grow out without a hard line."
Edgy Pixies: Undercuts, Disconnection and Asymmetry
Edge on a pixie comes from contrast, either between very short and longer hair or between one side and the other. These versions give up the forgiving grow-out of the soft cuts, so each needs real upkeep. The nape and sides follow the same options described in the nape options for a pixie.
5. Disconnected Shaggy Top over a #2 Undercut
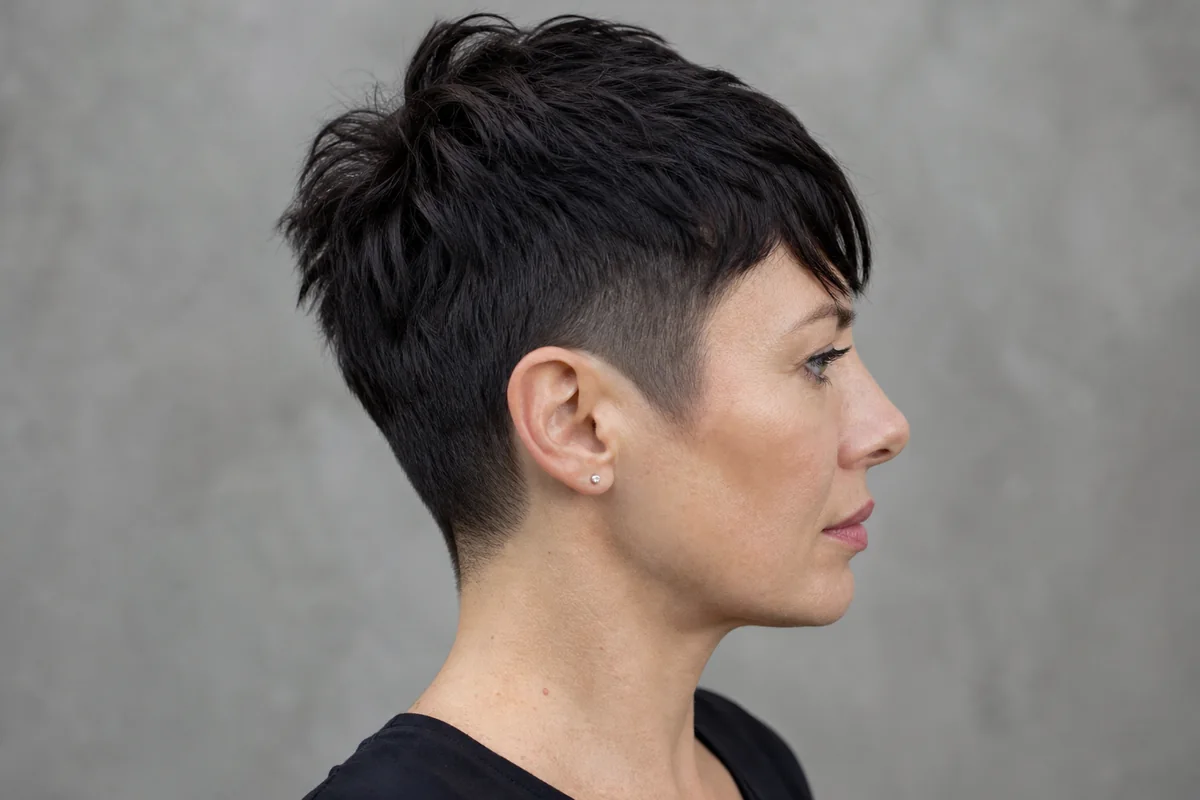
- Length
- 3 in on top, #2 guard (1/4 in) on sides and nape
- Texture
- Straight to wavy
- Density
- Medium to thick
- Face shapes
- Oval, heart, square
- Daily effort
- 5 minutes
- Trim every
- 4 weeks, cleanup at 2-3
Disconnection means there is no blend between the top and the sides, which is what makes the cut read as sharp. It also means a quarter-inch undercut triples in length in a month while the top barely changes, so the sides are the first thing to look overgrown.
Ask for: "A choppy 3-inch top, disconnected from sides clippered with a #2, and no blending at the ear."
6. Pixie Mullet with a Choppy Top and Long Nape Pieces
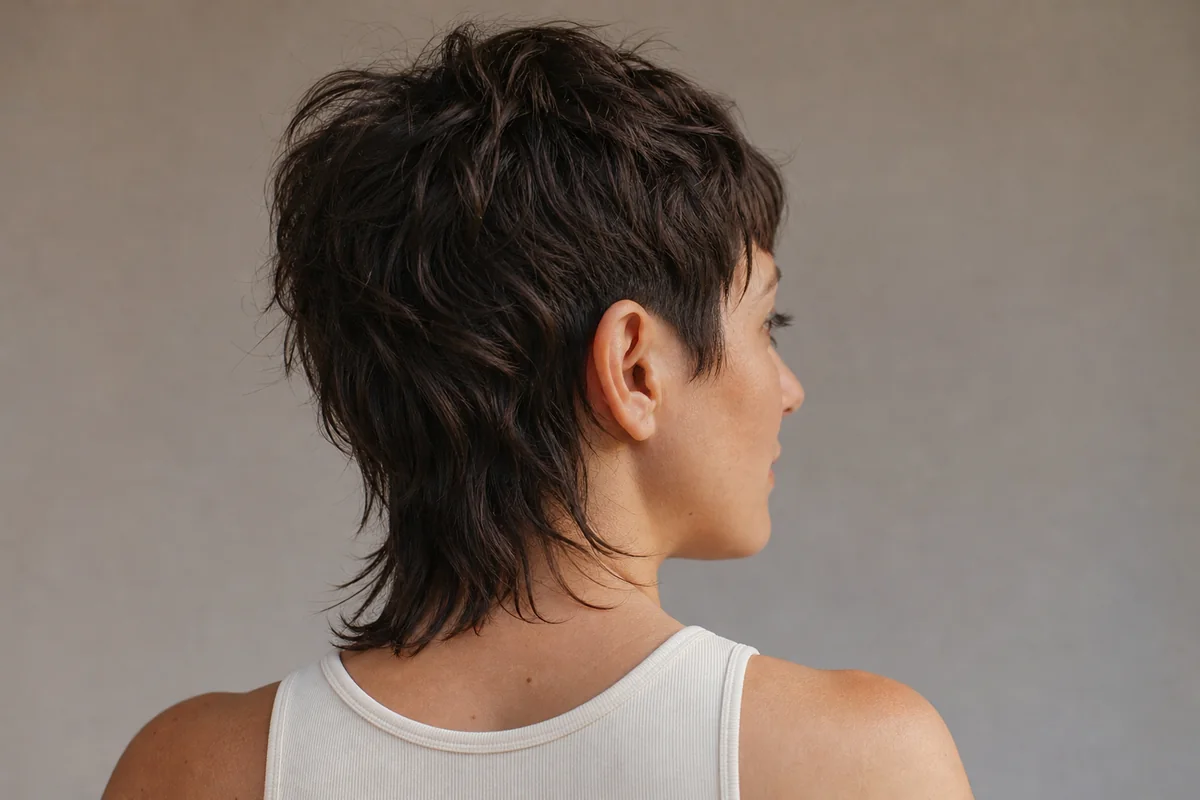
- Length
- 2.5 in on top, 3-4 in at the nape
- Texture
- Wavy to curly
- Density
- Medium to thick
- Face shapes
- Oval, round, long
- Daily effort
- 5-7 minutes
- Trim every
- 5-6 weeks
The back is the statement in this cut: pieces left at three to four inches while the crown stays short. Keep the top connected to the back by a few mid-length layers, or the shape stops looking planned. Waves and curls cushion the transition better than straight hair. Where the back runs longer and the sides blend into face-framing layers, the cut becomes a short wolf cut.
Ask for: "A pixie mullet: choppy 2.5 inches on top, nape pieces about 4 inches, and a few connecting layers so it blends."
7. Asymmetric Shaggy Pixie with One Side Cut Short
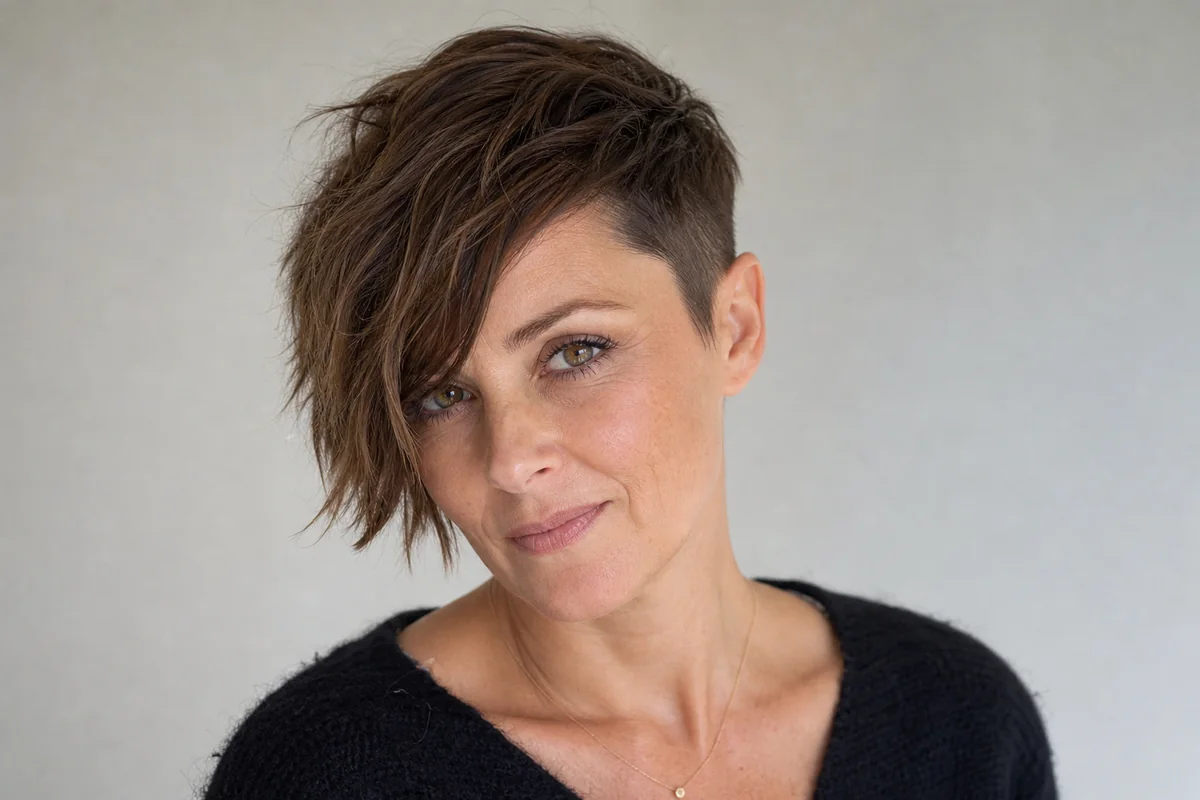
- Length
- One side above the ear, other to the cheekbone; 3 in on top
- Texture
- Straight to wavy
- Density
- Fine to medium
- Face shapes
- Round, square, oval
- Daily effort
- 5 minutes
- Trim every
- 4 weeks
The longer side adds width on one half of the face and the diagonal fringe adds length, which suits rounder faces that a centered cut would widen. Asymmetry is easiest to place along the natural part, so the hair falls where it already wants to go.
Ask for: "Cut the right side above the ear and leave the left to the cheekbone, with the fringe swept along my natural part."
8. Razored Shaggy Pixie with Feathered Edges on Gray Hair

- Length
- 2.5 in on top, feathered edges
- Texture
- Straight
- Density
- Medium
- Face shapes
- Oval, long, heart
- Daily effort
- 3-5 minutes
- Trim every
- 4-5 weeks
A razor suits this cut because the hair has enough density to afford the taper, and the feathered ends catch light on silver. Because the thin ends wear out, the shape looks best in the first three weeks, which is why a short trim interval pairs with it.
Ask for: "A razored shaggy pixie on damp hair with a fresh blade, ends feathered only at the last half inch."
Shaggy Pixies with Fringes and Longer Fronts
The fringe is where most shaggy pixies are personalized, because it is the one length that can change without altering the back. Fringes need a trim every 3-5 weeks whatever the rest of the cut does.
9. Shaggy Pixie with a Curtain Fringe

- Length
- Fringe to the cheekbone, 2 in at the crown
- Texture
- Straight to wavy
- Density
- Medium
- Face shapes
- Oval, heart, long
- Daily effort
- 5 minutes
- Trim every
- 4-5 weeks, fringe at 3
A curtain fringe frames the cheekbones where the shaggy top stops, so the cut has some length around the face. It depends on the hair parting naturally in the center, which a strong crown whorl can prevent.
Ask for: "A curtain fringe that ends at the cheekbone, parted at my natural center, blended into short crown layers."
10. Choppy Pixie with a Short Micro Fringe

- Length
- Fringe 1 in above the brow, 2 in on top
- Texture
- Straight
- Density
- Medium to thick
- Face shapes
- Oval, long, heart
- Daily effort
- 3-5 minutes
- Trim every
- 3-4 weeks
The micro fringe shortens the forehead visually and adds the most attitude of any front, but a quarter inch of growth is enough to change how it sits. It needs the straightest hair and the most frequent visits on the page.
Ask for: "A micro fringe about an inch above the brow, cut dry, with the rest of the top choppy at 2 inches."
11. Shaggy Pixie with a Long Swept Front and Tapered Back
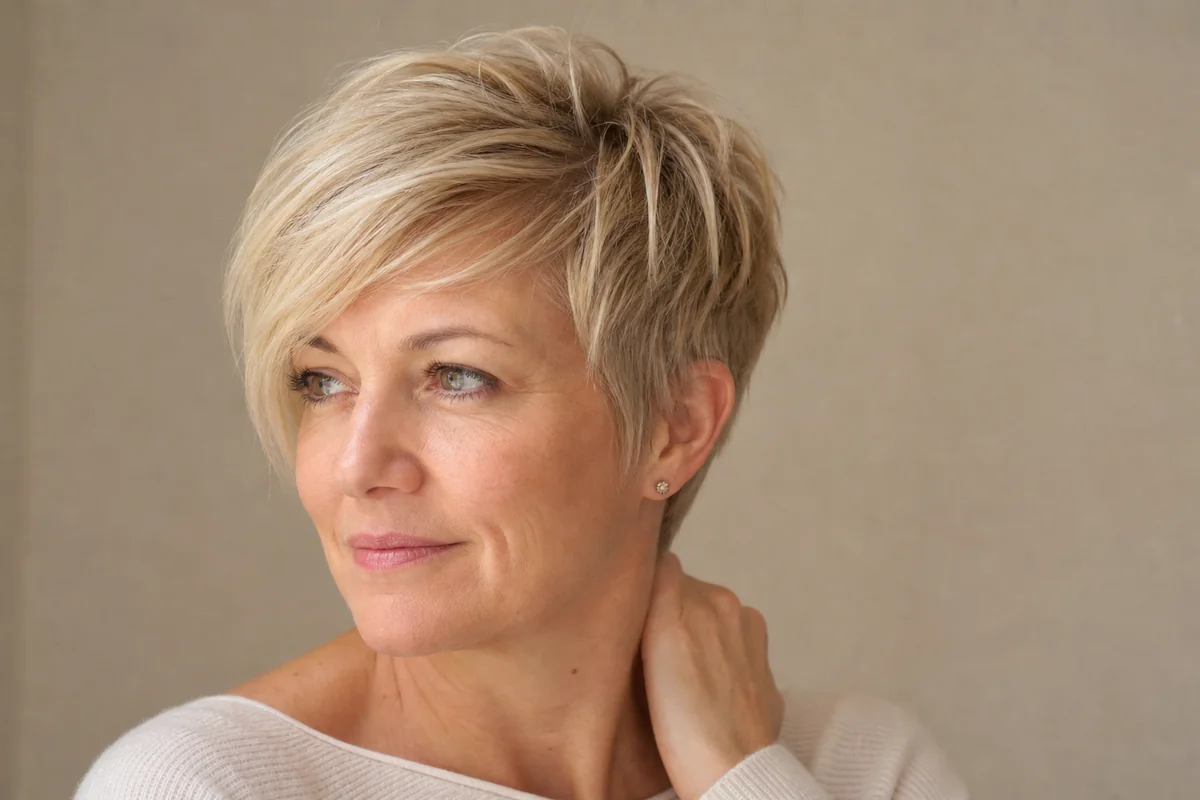
- Length
- 5 in at the front, 2 in at the crown
- Texture
- Straight
- Density
- Fine to medium
- Face shapes
- Round, square, oval
- Daily effort
- 5-8 minutes
- Trim every
- 5-6 weeks
A front this long gives a layered pixie room to be tucked behind an ear or swept across, and the difference in length between crown and fringe is what makes it read as shaggy. It starts to turn into a bixie once the sides lengthen too.
Ask for: "A 5-inch swept front, crown layers around 2 inches, and a short tapered nape so the back stays light."
12. Shaggy Pixie Bob with a Chin-Length Front and Cropped Crown
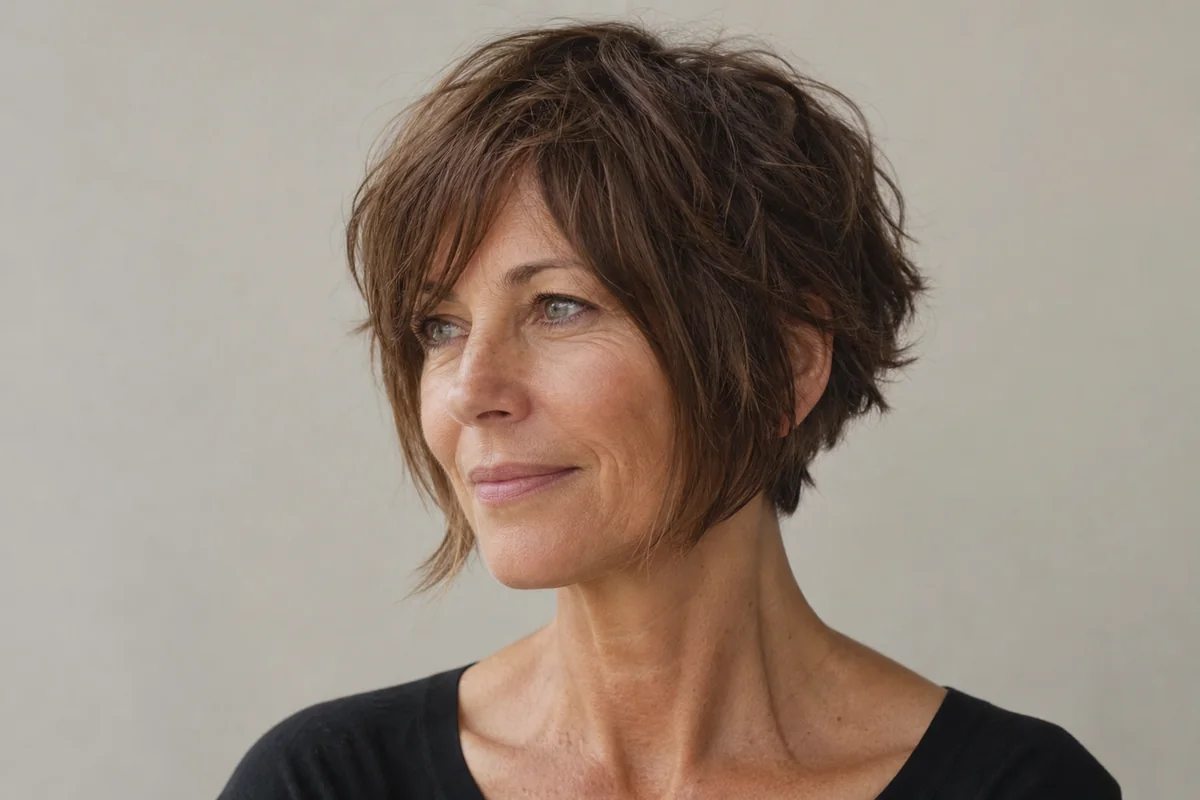
- Length
- Chin-length front, 2 in at the crown, short nape
- Texture
- Wavy
- Density
- Medium
- Face shapes
- Oval, round, long
- Daily effort
- 5-8 minutes
- Trim every
- 5-7 weeks
This is where the pixie borrows from a bob: face-framing pieces keep length at the jaw while the top and back stay short. It suits anyone who wants the shaggy texture but is not ready to lose the hair around the face.
Ask for: "Chin-length front pieces, short choppy crown layers, and a tapered back that stays off the collar."
Curly, Coily and Wavy Shaggy Pixies
On curls and coils the layers do the shaping and the curl pattern does the texturing, so these cuts are built differently from a razored straight pixie: cut dry or checked dry, longer than the target because curls shrink, with no razor. The full picture is in our short curly hair guide, which this section only summarizes.
13. Curly Shaggy Pixie with Rounded Crown Layers
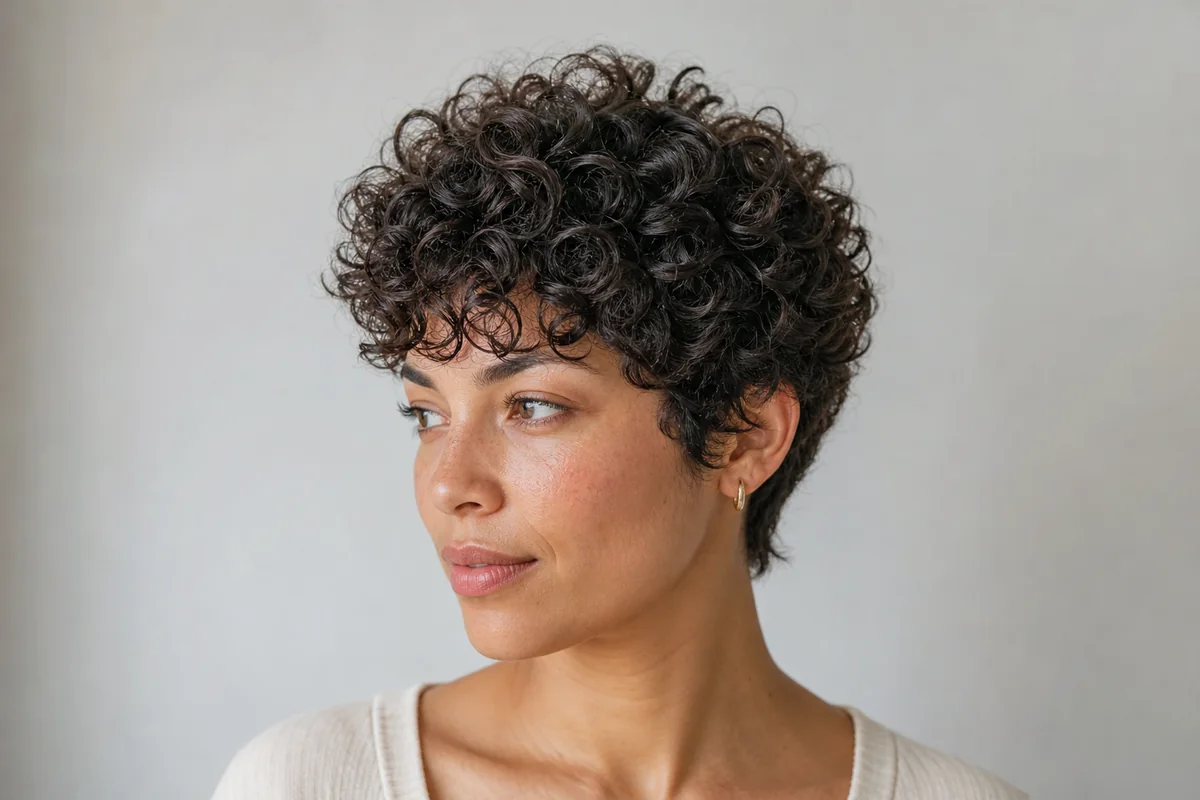
- Length
- 2-3 in when curls sit, 4-5 in stretched; tapered sides
- Texture
- Curly (3A-3C)
- Density
- Medium to thick
- Face shapes
- Oval, heart, long
- Daily effort
- 5 minutes with a diffuser
- Trim every
- 6-8 weeks
Layers at the crown stop curls from stacking into a pyramid. Cut curl by curl, each ringlet is shaped on its own so the round silhouette comes from the hair and not from product.
Ask for: "A shaggy pixie cut dry, curl by curl, with rounded crown layers and the sides tapered, leaving the top long enough to shrink to 2 inches."
14. Coily Crop with Shaped Layers and a Faded Edge
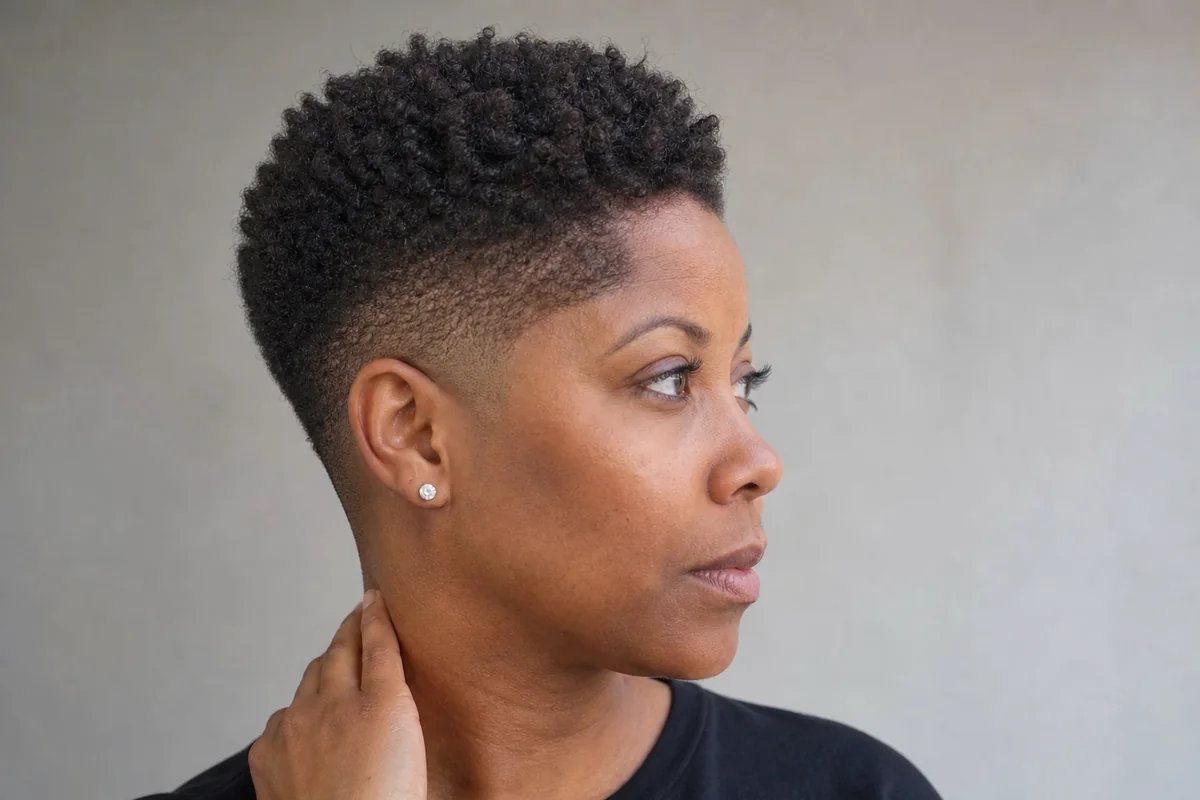
- Length
- 2-3 in on top, faded sides to a #2 guard
- Texture
- Coily (4A-4C)
- Density
- Medium to thick
- Face shapes
- Oval, round, heart
- Daily effort
- 2-5 minutes
- Trim every
- 3-5 weeks
For 4A-4C hair, shag means a shaped top with steps between sections, not a wispy cut. The edge is the sharpest part of it, and it should be done by a stylist who works with coily hair, since the same cut on a looser texture comes out very differently.
Ask for: "A shaped crop with stepped sections on top, left a little long to allow for shrinkage, and a faded edge to a #2."
15. Wavy Shaggy Pixie That Air-Dries into Shape
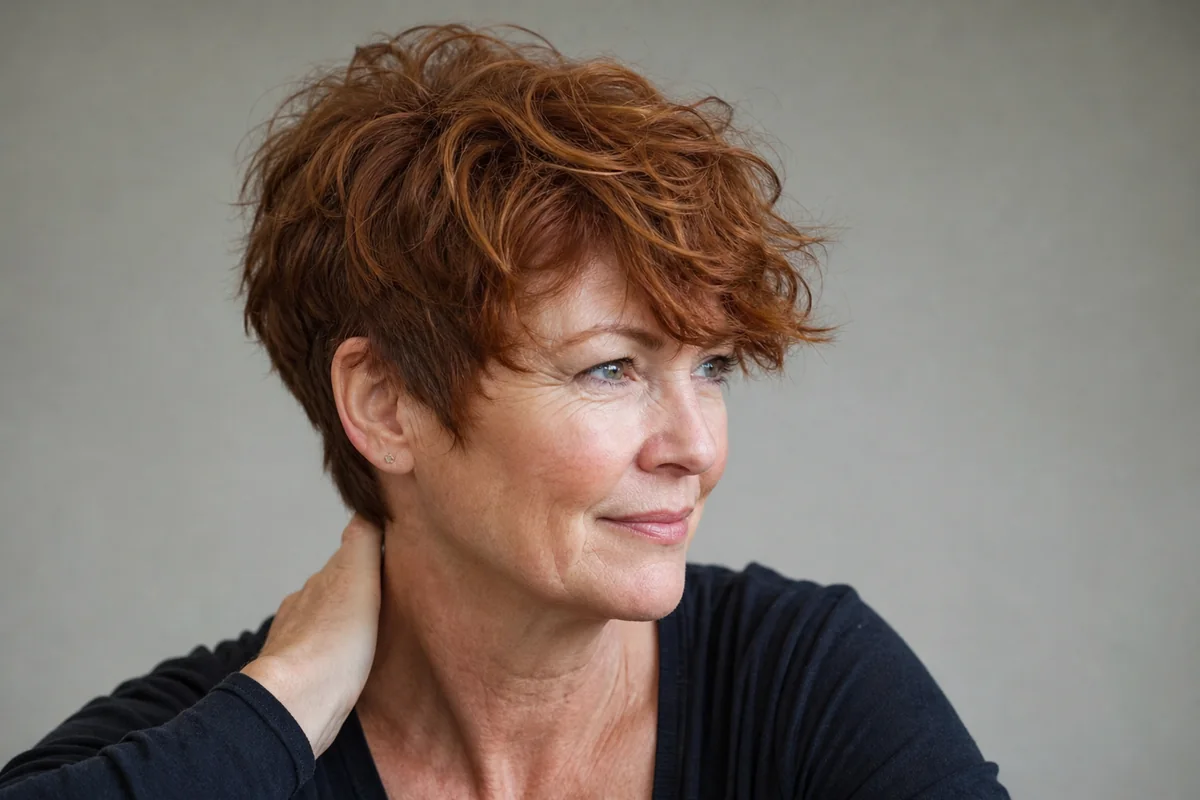
- Length
- 3 in on top, short layered sides
- Texture
- Wavy (2B-2C)
- Density
- Medium
- Face shapes
- Oval, round, square
- Daily effort
- 2-3 minutes
- Trim every
- 6 weeks
The least styled option on the page, because waves at three inches already sit in separate pieces. Scrunching in a light mousse while damp and leaving it alone is all the routine most mornings need.
Ask for: "A shaggy pixie that works with my waves air-dried, 3 inches on top, layers cut dry and no thinning."
16. Curly Shaggy Pixie with a Shaved Side Undercut
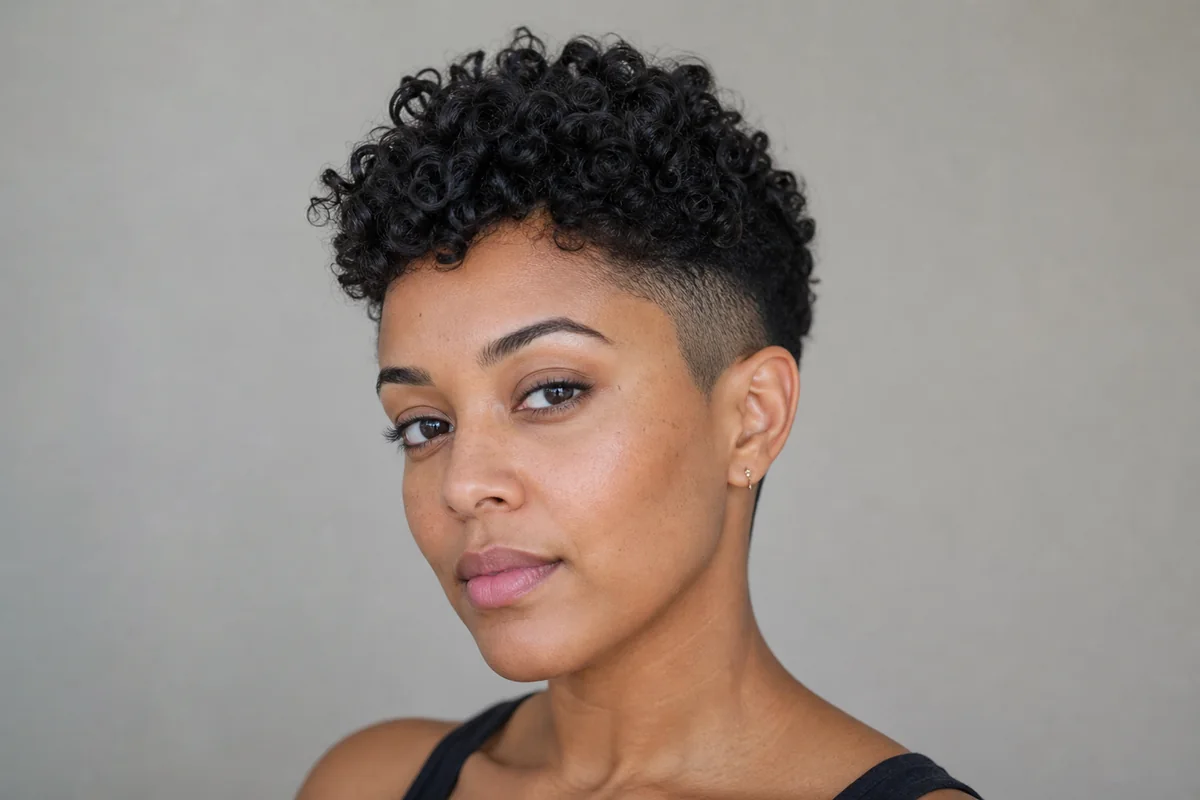
- Length
- 3 in of curls on top, one side at a #1 guard (1/8 in)
- Texture
- Curly to coily
- Density
- Thick
- Face shapes
- Oval, heart, long
- Daily effort
- 5 minutes
- Trim every
- 4 weeks, side at 2-3
Thick curls pile up at the sides, so removing one side takes real bulk out of the shape and gives it the edge. It requires regular side cleanups, and a clippered side can show the scalp more than the other, which some wearers prefer and some do not.
Ask for: "Keep 3 inches of curls on top, shaped dry, and clipper the left side with a #1, outline cleaned around the ear."
Shaggy Pixie Fit by Texture and Density
The same shaggy pixie is cut very differently depending on texture and density, because layers either gain lift or lose it. The pattern below shows the method and the failure to watch for.
| Hair | Fine | Medium | Thick |
|---|---|---|---|
| Straight | Crown layers only, point cut, solid edge (look 1) | Stepped layers, feathered nape (looks 4, 8) | Interior weight removed, no surface layering (look 3) |
| Wavy (2A-2C) | Short crown layers, checked dry, no thinning (look 2) | Air-dry shape, 3 in on top (looks 6, 15) | Slide cut to lighten; avoid shears (look 9) |
| Curly (3A-3C) | Light rounded layers; keep the top longer | Curl-by-curl layers, cut dry (look 13) | Layering plus a tapered side (look 16) |
| Coily (4A-4C) | Shaped crop, a little extra length | Stepped sections, faded edge (look 14) | Shaped crop, clippered edge (look 14) |
Density is the deciding factor on straight hair: fine hair keeps layers on top and an unbroken edge, and thick hair needs the weight removed from within. On curls and coils the cut is shaped dry in every row, since the way each curl springs back cannot be judged wet.
Choosing a Shaggy Pixie for Your Face Shape
A shaggy pixie changes the face's outline by adding width where the layers sit, so the aim is to put volume where the face is narrowest. The general rules for short cuts are on our full short haircut guide.
| Face shape | Aim | Shaggy pixie to try | Avoid |
|---|---|---|---|
| Round | Add height, keep the sides close | Crown lift with a diagonal fringe (looks 7, 11) | Layered width at the cheeks |
| Square | Soften the jaw corners | Wispy fringe, feathered sides (looks 2, 7) | A blunt, jaw-level fringe |
| Long | Add width, shorten the forehead | Micro or curtain fringe, side fullness (looks 9, 10) | Excess height on top |
| Heart | Balance a narrow chin | Side-swept fringe, fuller nape (looks 4, 12) | A very short, tapered nape |
| Oval | Few limits | Any look above | Nothing in particular |
What to Ask for at the Appointment
The most reliable way to get a shaggy pixie is to name the layer lengths and the finishing tool, since "shaggy" means something different to every stylist. A photo helps, but the words below carry the details a photo can't.
- Give the top in inches. "Two inches at the crown, three at the fringe." Layers closer than an inch together look soft; wider steps look choppy.
- Name the finishing method. "Point cut, no razor," or "razor on damp hair, last half inch only."
- Say what happens to the nape. "Feathered, around 2 inches" or "clippered with a #2." See the nape options for the trade-offs.
- Ask for dry checking. Wavy, curly and coily hair springs up as it dries, and layers can only be judged then.
- Mention cowlicks and the part. A crown whorl decides which way the top falls, and layers cut against it stand up.
Salon note: Short layers cannot be put back. Most stylists start the crown a little longer than the final plan and take it down at the next visit, which is a safer way to find out how the hair behaves with layers.
Styling a Shaggy Pixie Day to Day
A shaggy pixie is styled by roughing it up, not smoothing it down, and the work is mostly in picking the right dry product and applying it sparingly. Plan on 3-7 minutes.
- Dry it rough. Blow-dry with your fingers, lifting at the roots and pointing the dryer in the direction you want the layers to fall.
- Add grit. A pea-sized amount of paste or clay between the palms, or 4-8 spritzes of texture spray for fine hair, which weighs down with more.
- Separate the ends. Pinch and twist the tips so pieces stay apart.
- Finish light. A drop of oil on coarse or gray ends; nothing on fine hair.
Curly and coily hair is styled differently: a leave-in cream or gel on damp hair, a diffuser or air-drying, and then a fluff with the fingers once dry. Routines by length and product weight are in our guide to styling short hair.
Maintenance and Grow-Out of a Shaggy Pixie
A shaggy pixie needs a trim every 4-6 weeks but grows out more gracefully than a classic pixie, since the layers are already uneven and the lack of a hard line hides the growth. Hair grows about half an inch a month on average, though it varies with person and scalp area.
| Month | What happens | What to ask |
|---|---|---|
| 1-2 | Layers soften, fringe reaches the eyes | Fringe trim at week 3-5 |
| 3-5 | Ears and nape fill in; the awkward stage | Keep the nape tapered; take weight out around the ears |
| 6-8 | Crown layers reach the ears, shape becomes a bixie | Keep the back shorter, remove bulk |
| 8-12 | Sides and back reach chin length | Even the ends into a shaggy bob |
The jump from pixie to bob takes about 8-12 months, and month-by-month cutting advice sits in our guide to growing out a pixie cut. Shaggy layers make the in-between stages look purposeful, and the shaggy bob that results is described in our short shag guide. Curly and coily hair shows less growth month by month because of shrinkage, so the same grow-out takes longer to notice.
When a Shaggy Pixie Is Not the Right Choice
- Very fine, sparse hair at the crown. Razored or thinned layers remove the little hair that holds the shape up. A solid, point-cut pixie or a blunt crop looks fuller.
- Thick straight hair cut by someone who only layers the surface. Without weight removed underneath the layers stack instead of separating, and the cut looks bulky. Ask for interior work or choose a smoother pixie.
- A strong cowlick or whorl at the front hairline. Short layers and a fringe will stand up against it, so a longer fringe or a sideways sweep works better.
- If you want to skip product. A shaggy pixie looks unfinished with no texture product on straight hair; a clean classic or tapered pixie does not.
- If you attend appointments rarely. Undercut and micro-fringe versions look overgrown by week five. Choose the feathered nape or the wavy air-dry look.
A shaggy pixie cut rewards a stylist who names the layers in inches and finishes the ends to suit your hair, not one who simply adds texture. Choose from the looks above, copy the Ask for line closest to your hair, and book a trim at 4-6 weeks so the layers keep their steps.